Building the Sovereign Field Unit: A Complete DIY Guide to the Raspberry Pi 5 Tactical Cyberdeck
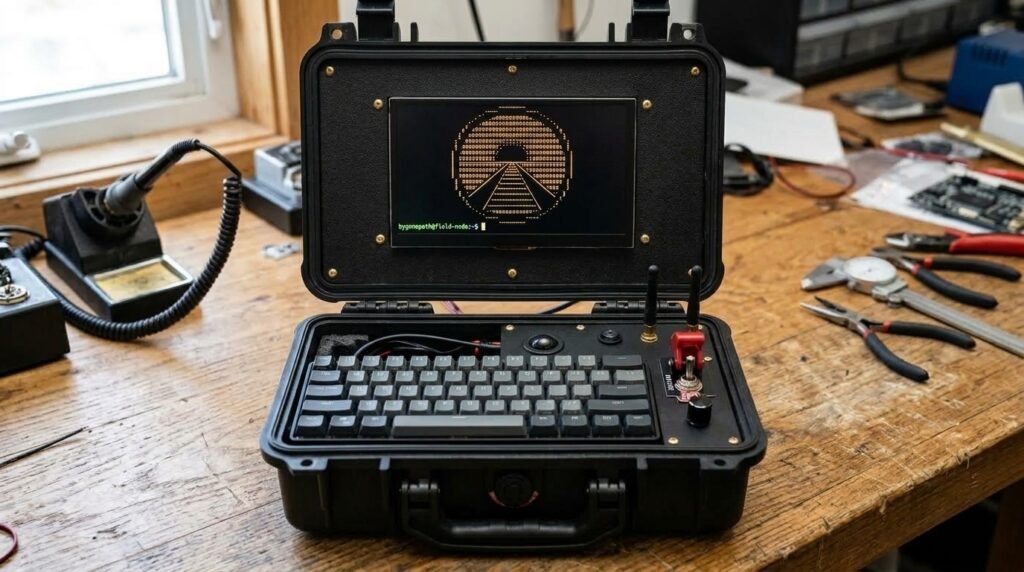
When the cell towers go dark, the power grid flickers, or you simply refuse to tether your computing life to someone else’s cloud, what do you reach for?
Modern commercial laptops are marvels of consumer engineering, but they are fragile glass sandwiches designed for air-conditioned coffee shops and perpetual internet connections. They are built inside the corporate walled garden—dependent on remote authentication servers, telemetry harvesting, and fragile charging bricks.
The solution is an old hacker dream brought into modern tactical reality: The Sovereign Field Unit. Built inside an indestructible, weatherproof hard case, powered by an internal battery that runs for hours off-grid, and equipped with local quantized AI models, offline knowledge archives, and decentralized LoRa mesh radios, this cyberdeck is a self-contained digital outpost.
Below is our complete engineering blueprint and sourcing guide so you can build one on your own workbench—along with an invitation if you’d rather have us build a bespoke unit for you.
What is “Local Sovereignty”? (And Why You Probably Don’t Have It)
Before turning a single screw or flashing an operating system, it is vital to understand the foundational philosophy behind this machine: Local Sovereignty.
Most modern technology is designed around an unspoken contract: convenience in exchange for obedience. Your commercial laptop, smartphone, and cloud-connected tablet are not truly yours. You rent access to an operating system that updates without your permission, streams background telemetry to corporate servers, and demands continuous network handshakes just to verify your software licenses. If an ISP cable is severed by an excavator, if a regional power substation trips, or if a platform algorithms flags your account, your sleek multi-thousand-dollar device is instantly crippled.
Local Sovereignty is the absolute operational capacity, ownership, and agency of your compute, data, communications, and power within your immediate physical reach. It means your tools work when the grid fails, when the towers are silent, and when you refuse to be surveilled.
A machine designed for local sovereignty adheres to four non-negotiable pillars:
- 1. Compute Sovereignty: Your operating system and software run directly on bare-metal silicon you physically hold. No remote telemetry, no forced background reboots, and no recurring subscriptions just to edit a document or query an algorithm.
- 2. Knowledge & Data Sovereignty: Critical intelligence—from technical field manuals, maps, and disaster medicine guides to encyclopedic archives—is stored locally on high-speed solid-state storage. You carry the library of human knowledge in your backpack, queryable in milliseconds with zero latency.
- 3. Communication Sovereignty: The ability to coordinate, broadcast, and listen across decentralized, peer-to-peer radio protocols (like LoRa mesh networks and Software-Defined Radio) that bypass cellular infrastructure and government or corporate choke points entirely.
- 4. Power & Physical Sovereignty: Built to endure dropping, rain, dust, and deep field deployments, powered by independent internal battery banks with physical hardware kill-switches that guarantee zero parasitic drain and complete radio silence when you need it.
The cyberdeck detailed below is not just a retro-futuristic aesthetic experiment; it is the physical, tangible realization of local sovereignty.
1. Anatomy of the Sovereign Field Unit
A true field workstation must balance four conflicting priorities: rugged physical survivability, low-power thermal efficiency, tactile usability in harsh environments, and complete offline independence.
- The Brain: Raspberry Pi 5 (8GB RAM) offering desktop-grade quad-core 2.4GHz ARM processing with PCIe Gen 2 expansion.
- High-Speed Storage: NVMe M.2 Solid State Drive over direct PCIe—eliminating the fragile read/write failure modes of traditional MicroSD cards.
- The Canvas: An 8.8-inch or 7.9-inch ultrawide IPS bar display tucked seamlessly into the lid.
- The Interface: A low-profile mechanical keyboard with tactile switches, designed for high-speed typing without eating precious vertical case depth.
- Off-Grid Radio: An integrated 915MHz LoRa mesh transceiver (Meshtastic) and RTL-SDR radio scanner for sniffing RF frequencies, satellite weather downlinks, and encrypted local communications.
- Chassis: IP67 dustproof and waterproof hard case with external antenna bulkheads and weather-sealed charging ports.
2. Complete Bill of Materials (BOM) & Sourcing Guide
Here is the exact hardware list with sourcing recommendations:
A. Compute, Thermal & Storage
- Raspberry Pi 5 (8GB): The 8GB model is non-negotiable if you plan to run local quantized Large Language Models (LLMs) and offline databases simultaneously. Source from authorized distributors: Adafruit, CanaKit, PiShop.us, or SparkFun (~$80).
- Active Cooling: The official Raspberry Pi Active Cooler (aluminum heatsink with PWM blower) or a Geekworm CNC armor case. The Pi 5 runs hot under sustained compile or inference loads; active airflow is mandatory inside a sealed Pelican case.
- PCIe NVMe Base HAT: Pimoroni NVMe Base, Pineberry Pi HatDrive, or official Raspberry Pi M.2 HAT+ (~$15–$25).
- NVMe SSD (500GB – 1TB): Standard M.2 2280 or 2242 drive (Crucial P3 or WD Blue). This holds your OS, offline Wikipedia (Kiwix), and local LLM weights with lightning-fast 450+ MB/s disk I/O.
B. The Enclosure & Structural Deck (3D Printer Completely Optional)
Many cyberdeck tutorials assume you own a calibrated $800 3D printer. You do not need a 3D printer to build a rock-solid, professional field unit. In fact, traditional analog fabrication using metals and tactical polymers often yields a tougher, more authentic military-spec chassis than 3D-printed plastic.
- Hard Case: Pelican 1150 or Pelican 1200 (the gold standard for indestructible cases). If you’re building on a budget, an Apache 1800 or 2800 from Harbor Freight costs under $20 and provides surprisingly rugged protection.
- Faceplate Material (Choose One):
- Kydex Sheet (.080″ / 2mm): The gold standard for tactical knife sheaths and holsters. Extremely durable, heat-formable with a standard hair dryer or heat gun, and can be scored with an ordinary utility knife and snapped over a table edge.
- 6061-T6 Aluminum Sheet (1.5mm – 2mm): Cuts easily with a hand jigsaw (metal blade) or handheld sheet metal nibbler. Provides natural RF shielding and heat sinking for the electronics.
- Matte Black Cast Acrylic (3mm): Rigid, sleek, and can be scored and snapped with a $6 acrylic scoring tool.
- 3D-Printed Bezel (Alternative): If you do have access to a printer, use PETG or Carbon Fiber PLA (PLA-CF) for high heat tolerance and rigidity.
- Mounting Support Without 3D Printing: 1/2″ aluminum L-angle brackets (from Lowe’s or Home Depot) bonded to the interior case ribs using 3M VHB 5952 tape (industrial double-sided acrylic foam tape that holds hundreds of pounds and requires zero drilling through the outer shell). Alternatively, use an official Pelican Panel Frame Kit (e.g., Pelican 1150PF).
- Fasteners: M2.5 and M3 brass standoffs, black oxide button-head hex screws, and rubber sealing washers.
C. Display & Visual Telemetry
- Waveshare 8.8″ (1920×480) or 7.9″ (1280×400) IPS Display: These panoramic “bar” screens fit natively into the lid of small tactical cases, leaving plenty of room for antenna routings, auxiliary status LEDs, and emergency cheat-sheets.
- Connections: Ultra-thin flat ribbon mini-HDMI to HDMI cables and 90-degree right-angle USB-C pigtails to minimize cable clutter.
D. Input & Typing Interface
- Keyboard: A 40% or 60% low-profile mechanical keyboard (e.g., Corne split, Planck, or a custom wired 60% PCB). Equip it with Kailh Choc V1 or V2 low-profile switches (Brown tactile or Red linear) to keep vertical height under 15mm.
- Navigation: An integrated optical trackball module (such as a Pimoroni Trackball breakout or miniature touchpad module) fitted directly beside the keyboard plate.
E. Field Power Subsystem
- Battery Pack: Anker or Baseus 65W USB-C Power Delivery (PD) power bank (20,000mAh to 26,800mAh). Crucial specification: The power bank must cleanly negotiate 5V @ 5A (25W) or use a USB-PD trigger module to prevent the Pi 5 from logging under-voltage warnings.
- Master Kill-Switch: Heavy-duty SPST military aircraft toggle switch with a red flip safety cover. Breaking the main DC circuit physically ensures zero parasitic battery drain when in storage.
- External Bulkhead: An IP68 weather-sealed panel-mount USB-C passthrough connector on the side of the case, allowing you to charge the internal power bank without ever breaking the internal seal.
F. Tactical Radio & Mesh Comms
- LoRa Mesh Node: Heltec WiFi LoRa 32 V3 (ESP32-S3) or Waveshare SX1262 LoRa module operating on 915MHz (North America) or 868MHz (EU). Flashed with Meshtastic for off-grid, encrypted text messaging and GPS telemetry across community mesh networks.
- Software-Defined Radio (SDR): RTL-SDR Blog V4 USB receiver with SMA antenna pigtails for monitoring local emergency bands, NOAA weather satellite images, and aviation ADS-B transponders.
- Bulkhead Connectors: Brass SMA female-to-male waterproof bulkhead connectors routed through the case rim with rubber O-rings.
3. Step-by-Step Build & Assembly Workflow
Step 1: Bench Prototyping
Before drilling a single hole in your Pelican case, assemble the core electronics on your workbench. Flash Raspberry Pi OS Lite (64-bit) to your NVMe SSD. Attach the Active Cooler, mount the M.2 HAT, and connect the display and keyboard. Power the unit from your selected battery pack and run:
vcgencmd get_throttledEnsure the output returns throttled=0x0. If you see under-voltage flags, verify your USB-PD cable gauge and trigger module before proceeding.
Step 2: Chassis Layout & Machining (The Zero-3D-Printer Blueprint)
If you don’t have a 3D printer, you can build a cleaner, tougher, and more authentic field deck using traditional hand tools or accessible services. Here are the four best ways to build the structural decks without a 3D printer:
Method A: The Kydex / Aluminum Cardboard Template Method (Hand Tools Only)
1. Create a Template: Cut a piece of rigid corrugated cardboard or chipboard to match the internal perimeter of the Pelican case lid (for the display) and the bottom tray (for the keyboard). Trim in small increments until it drops in with a snug, friction fit.
2. Trace Your Components: Place your Waveshare ultrawide screen, keyboard, and toggle switches directly on the cardboard template. Trace their perimeters and mounting holes with a fine-point pencil.
3. Score & Snap (Kydex): If using 2mm Kydex, clamp a metal ruler along your cut lines and score deeply 4–5 times with an ordinary utility knife. Place the scored line over a sharp table edge and apply quick, downward pressure—it will snap with a clean, factory-grade edge. Use a handheld lighter or heat gun to gently round the corners.
4. Cutting Aluminum: If using 1.5mm–2mm aluminum sheet, cut perimeter lines with a standard hand hacksaw or a jigsaw equipped with a 24-TPI metal-cutting blade. For interior rectangular screen cutouts, drill 3/8″ starter holes in each corner, insert a coping saw or jigsaw blade, and cut between the holes. Finish with a medium-grit metal hand file.
Method B: Internal L-Angle Brackets with 3M VHB (No Outer Drilling)
How do you hold the faceplate inside the case without 3D-printed brackets? Buy a 3-foot stick of 1/2″ aluminum L-angle stock from your local hardware store ($6). Cut four 1.5-inch pieces. Clean the internal polypropylene ribs of your Pelican case with 90%+ isopropyl alcohol, then mount the L-brackets using 3M VHB 5952 tape. After 24 hours of curing, VHB tape creates a bond capable of holding over 100 pounds. You now have solid aluminum mounting shelves inside the case to screw your faceplate down using standard sheet metal screws—preserving 100% of the case’s waterproof exterior.
Method C: Official Pelican Panel Frame Kits (100% Factory Fit)
If you prefer an off-the-shelf solution, Pelican manufactures dedicated Panel Frame Kits (e.g., Pelican 1150PF or 1200PF). These kits provide an injection-molded, O-ring sealed perimeter rim that mounts directly into the case’s factory internal bosses. Once the frame is installed, you only need to cut a simple flat rectangle of aluminum, acrylic, or Kydex to screw into the pre-drilled holes.
Method D: On-Demand 2D Laser Cutting ($15–$25 via SendCutSend)
If you want laser-precise CNC cutouts for your ultrawide screen and keyboard without spending hours with a coping saw, use an online laser-cutting service like SendCutSend or OSHCut. Draw your flat plate in free 2D CAD (or use SendCutSend’s browser builder), specify 5052 aluminum or matte black Delrin, and upload the file. They will laser cut the plate, countersink the mounting holes, and ship it to your door in 3 to 4 business days for roughly $20.
External Weatherproof Machining: When drilling external antenna bulkhead ports (SMA) or the USB-C passthrough through the case wall, always use a stepped drill bit (unibit) at low RPM. Standard spiral drill bits grab and tear polypropylene plastic; a stepped bit cuts clean, burr-free circular holes. Always install rubber O-rings behind the bulkhead nuts to maintain your weather seal.
Step 3: Power Routing & Thermal Management
Mount the battery bank in the lowest floor of the case to maintain a stable center of gravity. Wire the positive DC lead through the aircraft toggle switch. In a sealed chassis, hot air can stagnate—ensure the lower mounting deck includes ventilation intake grilles near the bottom edges so the Pi 5 Active Cooler can draw ambient air across the board.
Step 4: Securing the Deck
Fasten the keyboard deck onto brass standoffs anchored into the case base. Route all internal wiring with braided sleeve looms to prevent pinching when closing the lid.
4. The Software Stack: Total Digital Independence
A rugged physical shell is useless without software designed for zero-connectivity environments:
- Kiwix Server: Download the entire offline text of Wikipedia, Project Gutenberg’s library of literature, and emergency disaster medicine handbooks into compressed
.zimfiles stored on your NVMe drive. - Local Quantized AI (Ollama / llama.cpp): With 8GB of RAM on the Pi 5, you can run compact, highly-capable models like Qwen 2.5 (1.5B), SmolLM2 (1.7B), or Llama 3.2 (1B) at 12–18 tokens per second. You have an intelligent offline coding assistant, document summarizer, and research partner in the middle of nowhere.
- Meshtastic Comms: Connect to the local LoRa radio node via serial or Bluetooth to broadcast encrypted messages miles across mountain ridges or city blocks without cellular infrastructure.
- SDR++ / GQRX: Plug in your SDR antenna to monitor emergency broadcasts, decode weather satellite imagery, and analyze RF signals.
Don’t Have 40 Hours to Solder & 3D Print? We’ll Build Yours.
Building a custom cyberdeck from scratch is one of the most rewarding hardware projects an engineer or enthusiast can tackle. But between sourcing parts across ten different distributors, tuning 3D printer tolerances, machining weatherproof enclosures, and debugging USB-PD power delivery, it can easily consume 40 to 60 hours of bench time.
If you love the concept of the Sovereign Field Unit but want a turn-key, battle-tested system ready to deploy, Bygonepath Labs builds bespoke hardware.
We hand-assemble each unit with precision CNC fittings, calibrated thermal airflow channels, military-spec wiring harnesses, and pre-configured offline intelligence environments tailored to your specific field needs.
Whether you need a field diagnostic station for emergency response, an off-grid comms rig, or a dedicated sovereign compute terminal, we can build one specially for you.